
The Integrations section of iDonate connects your fundraising platform to the other tools your organization depends on. From CRM synchronization to custom event-driven workflows, iDonate's integration layer is designed to keep your donor data accurate and up to date across systems without manual effort.
Integrations are accessed by navigating to Integrations in the navigation menu. This page is organized into three tabs: Marketplace, Custom Workflows, and Logs.
Marketplace
The Marketplace is your starting point for enabling pre-built integrations. Available integrations are grouped by category. Each integration tile in the Marketplace displays a brief description of what the integration does. A green checkmark on a tile indicates the integration has been activated for your organization.
You can use the search bar or the All / Activated toggle in the top right to filter what is displayed.
Custom Workflows
Custom Workflows allow you to build and manage integrations for platforms iDonate doesn't natively support, such as Mailchimp, Slack, or QuickBooks. This tab displays all workflows configured for your organization and provides an Add new workflow button to create additional ones. If no workflows have been created yet, this tab will show an empty state.
Building and managing custom workflows requires some technical knowledge of APIs and data mapping.
Logs
The Logs tab provides a record of all integration activity for your organization. Each log entry displays a timestamp, log type, flow name, instance, config variable, and message. This is useful for monitoring integration health and troubleshooting issues.
Logs can be filtered by log type, time range, log severity, and instance using the Filter menu. You can also search logs directly or refresh the view to pull in the latest activity.
Logs and step results are retained for 14 days before automatically being deleted.
Managing an Active Integration
Once an integration is active, you can manage it at any time by navigating to Integrations > Marketplace and clicking on the integration tile. This opens a detail panel showing the integration's category, description, and an overview of its configuration.
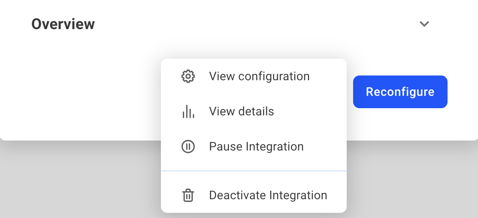
Click the ellipsis menu (...) next to the Reconfigure button to access the following options:
- View configuration: Review the current settings for the integration.
- View details: See additional information about the integration instance.
- Pause Integration: Temporarily stop data from syncing without removing your existing settings. Use this option if you need to suspend the integration and plan to resume it later.
- Deactivate Integration: Completely stop data from syncing and remove the integration. All previous configuration settings will be lost. This action cannot be undone.
Before deactivating an integration, consider using Pause Integration instead. Pausing temporarily stops syncing while preserving your configuration, making it easy to resume later. Deactivating permanently removes all settings.