
This article guides through how to connect iDonate to Salesforce NPSP, configure settings, field mapping, and managing the connection over time.
This documentation is only for Salesforce NPSP. If you are using a different Salesforce package please reach out to iDonate Support.
Prerequisites
Before beginning, make sure you have:
- Access to an iDonate Admin user.
- Admin access to your Salesforce account with NPSP installed.
- A properly configured permission set in Salesforce.
Connecting to Salesforce
- From within iDonate, click Settings Cog > Integrations (beta)
- Click Salesforce from within the Marketplace - this will open the Salesforce Config Wizard.
- Click Configure.
- Click Connect and login to Salesforce via the login page that opened.

- Once logged in, return to the Config Wizard and click Next.
The yellow circle next to Salesforce Connection will turn green upon a successful login.
Sandbox vs. Production Configuration
Users can switch between Production and Sandbox environments by updating the Salesforce domain in the OAuth URLs and signing in with user credentials from the corresponding environment. The integration is set up for Production by default and uses iDonate’s Salesforce Connected App unless a custom Connected App is provided.
Moving between environments simply requires changing the domain in the OAuth URLs to either login.salesforce.com for Production or test.salesforce.com for Sandbox, then authenticating with a user from that environment.
The integration uses three Salesforce OAuth endpoints:
• Authorize URL: https://login.salesforce.com/services/oauth2/authorize
• Token URL: https://login.salesforce.com/services/oauth2/token
• Revoke URL: https://login.salesforce.com/services/oauth2/revoke
Connected Apps
Connected Apps enable external systems to integrate with Salesforce by providing secure, authorized access to data through APIs and standard authentication protocols. By default, this integration utilizes an iDonate Connected App. Using your own Connected App will give you the flexibility to apply any additional security controls or permissions required by your organization.
If you choose to use your own Connected App, follow the Salesforce OAuth 2.0 setup instructions provided by our integration partner, Prismatic, and enter the Consumer Key and Consumer Secret from your Connected App. Keep in mind that once these values are replaced, they cannot be reverted to their original defaults.
Please note, iDonate is unable to provide troubleshooting or support for custom Connected App configurations.
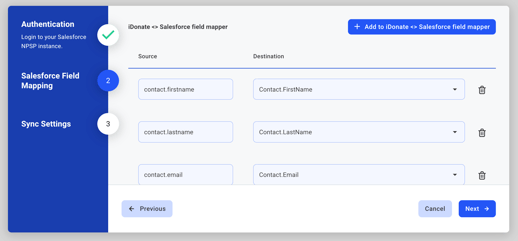
Field Mapping Configuration
Use the Salesforce Field Mapping screen to define how data from iDonate maps to fields in Salesforce. This setup ensures that information from iDonate is stored in the right place within your Salesforce instance.
Adding or Editing Field Mappings
iDonate sets default field mappings, however, you can create or update field mappings as needed.
To map additional fields, click the + Add to iDonate <> Salesforce field mapper button. New Source and Destination inputs will appear at the bottom of the field mapping list.
Understanding Source and Destination Fields
-
Source: The iDonate data field from the event payload.
-
Enter the target field using the format [OBJECT_NAME].[FIELD_NAME].
-
-
Destination: The Salesforce object and field where the iDonate data will be saved.
-
Scroll through the dropdown menu, which is organized by object, to find and select the target field for your mapping.
-
The name you assign to a custom form field (the value entered in “Name This Custom Field” in the iDonate form builder) must exactly match the value you enter in the Source input when mapping fields.
For consistency with other data fields, use all lowercase letters and underscores instead of spaces when defining your custom field name (e.g. transaction.customer_meta.my_custom_form_field)
Sync Settings
Sync Settings determine how data flows and behaves within your Salesforce integration. Review each setting carefully — they directly impact how information is processed and synced.
Designations and Processing
- Default Designation: When a transaction occurs and does not have an associated designation, the export will use this designation when exporting to your CRM.
- Donor Fee Processor: Determines how donor fees are processed.
- Donor Fee Designation: The designation that will receive all donor covered fees. Required if "Donor Fee Processor" is set to "Standard". Defaults to "Standard".
- Recurring Donation Processor: Select your recurring donation processor.
- Use Fiscal Year Recurring if you want iDonate to add recurring donation payments to the same Salesforce opportunity throughout a fiscal year. iDonate will create a new opportunity at the start of a fiscal year.
- Select NPSP Legacy or Enhanced Recurring if you want iDonate to create separate Salesforce opportunities for each recurring donation payment. You must have your Salesforce instance configured to use NPSP Legacy or Enhanced Recurring.
- Closed Fiscal Year Adjustments: When enabled, this setting authorizes your integration to push opportunity changes to Salesforce for closed fiscal years. Enabled by default.
- Note, your identification is logged when modifying this setting. By setting this property to true, you are responsible for changes your integration makes to Salesforce opportunities for closed fiscal years.
Opportunity Configuration
- Opportunity Name Format: Opportunity Name Format uses customizable fields. The following is a list of recognized keywords that the integration can interpret. You must include the double brackets:

- Closed Stage Flag: The name of the Stage that should be set on an opportunity or recurring opportunity at the time the last payment in a fiscal year is made. Default is "Closed Won".
- Fiscal Year Recurring: Opportunity Amount Calculation: Used for Fiscal Year Recurring Processing Only.
- For organizations using fiscal year recurring, select Fiscal Year Forecast if you want the Opportunity amount to be the amount forecasted for the current fiscal year AND Default Allocations Enabled is false in Salesforce; you cannot use Fiscal Year Forecast if your Salesforce instance is using Default Allocations.
- Select Cumulative Total if Default Allocations Enabled is true in Salesforce OR you simply want the Opportunity amount to be the running total after each installment.
- Include Description: When enabled, the transaction.description will be sent to your CRM's note field. Enabled by default.
Account and Contact Management
- Use NPSP Account Record Types: Donations with a company name use the Organization Account Record Type. Otherwise, Household Account is used. If enabled, Salesforce will require the Organization Record Type to be set up. See Assign the Organization Record Type to Profiles for more info.
- Use Company Accounts: When enabled and a donation includes a company name, iDonate will create an account representing the company and associate the opportunity with the company account. When false, iDonate associates all opportunities with the donor account. Disabled by default.
Data Export Options
- Export Offline Gifts: When enabled, all offline gifts entered in iDonate will be exported to your CRM. Enabled by default.
- Export Ticket Purchaser: When enabled, the integration exports the ticket purchaser as a contact to the CRM. Enabled by default.
Event Tickets
- Ticket Description: The value that will appear in the description field in Salesforce on the ticket record. Defaults to Created by iDonate's integration.
After reconfiguring any settings in the Config Wizard, be sure to click Finish on the final step. Changes are only saved once you complete the wizard by selecting Finish.
To pause or deactivate this integration, see Managing an Active Integration in Integrations Overview. If you run into issues with your integration, contact iDonate Support with any relevant details from the Integrations Logs tab.